Tired of the perpetual dinner dilemma? You know the drill: staring blankly into the fridge, a pack of chicken breasts in hand, completely devoid of inspiration. We’ve all been there. But what if we told you that a spectacularly flavorful, comforting, and versatile meal could be on your table with minimal effort and just a handful of ingredients? Enter Cheesy Salsa Chicken: The Versatile Dump-and-Bake Dinner – your new secret weapon for stress-free weeknights.
This isn't just another chicken dish; it’s a culinary revelation that marries the vibrant zest of your favorite salsa with succulent chicken and a blanket of molten cheese, all cooked to perfection in one single pan. It's the ultimate 'dump-and-bake' marvel, making it an absolute lifesaver for busy households, meal preppers, and anyone craving big flavors without the fuss. If you’re searching for an easy, impactful salsa chicken recipe that consistently delivers, you’ve just found it.
What Makes Cheesy Salsa Chicken a Weeknight Winner?
When it comes to quick, wholesome dinners, few dishes hit the table faster or taste better than baked salsa chicken. It’s a family favorite for good reason, checking all the boxes from convenience to crave-ability. Here’s why this dish is about to become your new go-to:
The Allure of Simplicity: Dump-and-Bake Magic
- Minimal Effort, Maximum Flavor: The beauty of this recipe lies in its sheer simplicity. There's no fancy equipment needed, no intricate techniques to master. You literally "dump" the ingredients into a baking dish and "bake" them. It’s an ideal dish for beginners or anyone who loves bold flavors but hates long ingredient lists.
- Only 3-5 Key Ingredients: At its core, you only need chicken, salsa, and cheese. Add a sprinkle of seasoning, and you're good to go. This streamlined approach saves you time both at the grocery store and in the kitchen.
- Perfect for Busy Nights: From prep to plate, this dish is often ready in under 35 minutes, making it a dream come true for those evenings packed with after-school activities, late meetings, or simply when you just want to unwind.
- Virtually No Cleanup: Cooking everything in one baking dish significantly cuts down on washing up, leaving you more time to enjoy your meal and less time scrubbing pots.
Flavor That Delivers: A Tex-Mex Tango
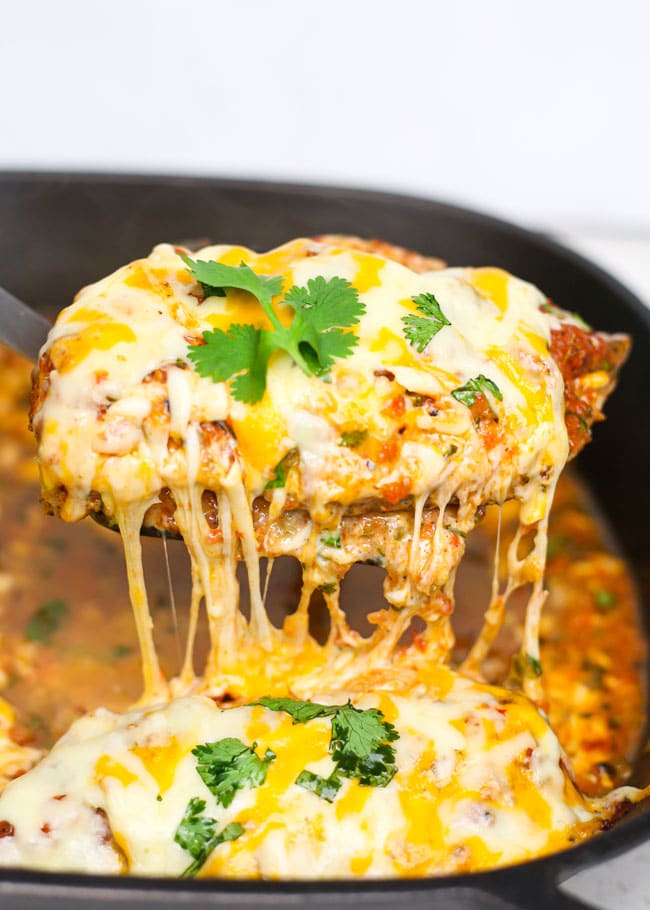
The combination of tender, juicy chicken, bright and zesty salsa, and gooey, melted cheese is an irresistible trio. The salsa doesn't just add flavor; its acidity gently tenderizes the chicken as it bakes, ensuring every bite is moist and succulent. Broiling the dish at the very end is the secret to achieving that irresistible golden-brown, bubbly cheese crust that elevates the entire experience.
Unbeatable Versatility: Beyond the Plate
One of the most appealing aspects of this easy baked salsa chicken is its incredible versatility. It adapts beautifully to various serving styles and dietary needs:
- Serve It Whole: For a classic presentation, place the baking dish on a trivet and let everyone serve themselves whole chicken breasts.
- Shred It Up: Once baked, the chicken shreds effortlessly, perfect for stuffing into tacos, burritos, quesadillas, or as a hearty filling for enchiladas.
- Meal Prep Powerhouse: It reheats beautifully, making it an excellent choice for meal prepping lunches or dinners for the week ahead.
- Dietary Adaptability: Naturally gluten-free, this dish can also be easily tweaked to be keto- and low-carb friendly by simply omitting beans (if adding them) and opting for full-fat cheese.
Crafting Your Perfect Salsa Chicken: Ingredients & Customization
The beauty of this simple salsa chicken recipe lies in its flexibility. While the core ingredients remain consistent, there's ample room to personalize it to your taste.
The Core Trio: Chicken, Salsa, and Cheese
- The Chicken: Boneless, skinless chicken breasts are a popular choice for their lean protein and quick cooking time. For extra juiciness and flavor, boneless, skinless chicken thighs are an excellent alternative. If using breasts, consider pounding thicker sections slightly to an even thickness (about 1 inch) to ensure uniform cooking.
- The Salsa: This is where you can truly let your preferences shine!
- Red vs. Verde: Traditional red tomato salsa offers a classic, robust flavor, while salsa verde (green salsa) provides a brighter, tangier, and often milder profile, derived from tomatillos. Both work wonderfully, so choose what you love.
- Heat Level: From mild to extra hot, pick a salsa that matches your family's spice tolerance.
- Texture: Chunky salsas add more texture and body to the sauce, while smoother varieties create a more uniform coating. A key tip: look for a thicker store-bought salsa, as some can be quite runny and result in a watery sauce. If your salsa is on the thinner side, you might consider simmering it briefly on the stovetop to reduce it before adding it to the chicken, or using less liquid.
- Homemade vs. Store-Bought: While a homemade salsa will undoubtedly elevate the flavor, a good quality store-bought jarred salsa is perfectly acceptable for convenience. Fire-roasted tomato salsa can add a delightful smoky depth, and for a unique twist, don't shy away from fruit-based salsas like mango or pineapple for a sweet and savory kick.
- The Cheese: A generous layer of melted cheese is non-negotiable for "Cheesy Salsa Chicken." Shredded cheddar, Monterey Jack, or a classic Mexican blend are all fantastic choices, melting beautifully to create a gooey, comforting topping. For those who like a little extra kick, pepper jack cheese is an excellent option that adds a touch of heat. Freshly shredded cheese melts better than pre-shredded varieties, which often contain anti-caking agents.
Elevate Your Flavor: Optional Additions
While the basic three ingredients create a fantastic dish, a few optional additions can take your salsa chicken to the next level:
- Spices: A sprinkle of cumin, garlic powder, onion powder, chili powder, or smoked paprika on the chicken before adding the salsa can deepen the Tex-Mex flavors.
- Aromatics: Finely diced onion and minced garlic can be scattered over the chicken before adding the salsa for an extra layer of savory depth.
- Vegetables: For a more complete meal in one pan, consider adding canned black beans (rinsed and drained), corn (fresh, frozen, or canned), or diced bell peppers directly to the baking dish alongside the chicken and salsa.
- Garnishes: Fresh cilantro, sliced green onions, diced avocado, a dollop of sour cream or Greek yogurt, and a squeeze of fresh lime juice are all excellent ways to brighten and finish the dish before serving.
Step-by-Step to Salsa Chicken Perfection: A Dump-and-Bake Guide
Ready to make this culinary magic happen? Here’s a simple, foolproof guide to creating your ultimate cheesy salsa chicken.
Prep Smart, Not Hard
- Preheat & Prepare: Preheat your oven to 400°F (200°C). Lightly grease a 9x13 inch baking dish or an appropriately sized dish for your amount of chicken.
- Chicken Prep: Pat your boneless, skinless chicken breasts or thighs dry with paper towels. This step is crucial as it helps the seasonings adhere and prevents the chicken from steaming rather than baking, contributing to a better texture. Season both sides lightly with salt, black pepper, and any optional spices like garlic powder or cumin.
The Dump-and-Bake Method
- Arrange the Chicken: Place the seasoned chicken pieces in a single layer in your prepared baking dish. Avoid overcrowding the pan, as this can lead to uneven cooking and a watery sauce.
- Pour the Salsa: Generously spoon or pour your chosen salsa over the chicken, ensuring each piece is well coated. The salsa should gently nestle around and partially cover the chicken.
- Bake (First Stage): Transfer the baking dish to the preheated oven and bake for 20-25 minutes, or until the chicken is almost cooked through. The internal temperature should be around 155-160°F (68-71°C) at this stage.
- Add the Cheese & Broil: Carefully remove the dish from the oven. Evenly sprinkle your shredded cheese over the chicken and salsa. Return the dish to the oven and bake for another 5-10 minutes, or until the cheese is beautifully melted and bubbly. For an extra golden-brown crust, switch your oven to broiler mode for the last 1-3 minutes, watching it very carefully to prevent burning. The internal temperature of the chicken should reach 165°F (74°C).
- Rest & Serve: Once removed from the oven, let the salsa chicken rest for 5-10 minutes before serving. This allows the juices to redistribute, ensuring maximum tenderness and flavor.
Pro Tips for the Best Results
- Don't Skimp on the Salsa: A good layer of salsa keeps the chicken moist and infuses it with flavor.
- Use a Meat Thermometer: The best way to ensure perfectly cooked (never dry!) chicken is to use an instant-read meat thermometer. Chicken is safely cooked at 165°F (74°C).
- Rest is Best: Don't skip the resting period. It makes a significant difference in the juiciness of the chicken.
- Thick Salsa Preference: As mentioned, a thicker salsa will yield a richer sauce that clings to the chicken better. If yours is watery, don't worry, it will still taste great, but might require a spoon to serve.
Serving Suggestions & Creative Leftovers
The beauty of this salsa chicken recipe extends far beyond its initial presentation. Its versatility means it can transform into countless new meals!
From Plate to Party: How to Serve
- Classic Comfort: Serve whole chicken breasts alongside fluffy white or brown rice, black beans, and a simple steamed vegetable like green beans or broccoli.
- Low-Carb Options: For a lighter meal, pair it with cauliflower rice, zucchini noodles, or a fresh, crisp side salad.
- Tex-Mex Feast: Warm corn or flour tortillas are a must! Shred the chicken right in the pan and serve it with warm tortillas, fresh cilantro, avocado slices, and a dollop of sour cream for build-your-own tacos or burritos. It also makes a fantastic filling for quesadillas or enchiladas.
- Hearty Bowls: Create vibrant chicken bowls with quinoa or farro, roasted sweet potatoes, and a sprinkle of crumbled cotija cheese.
Maximizing Your Meal: Leftover Brilliance
This dish is fantastic for meal prep! Store any leftover salsa chicken in an airtight container in the refrigerator for up to 3-4 days. It can also be frozen for up to 2-3 months. Reheat gently in the microwave or oven until warmed through.
Transforming leftovers is easy:
- Speedy Nachos: Layer shredded salsa chicken over tortilla chips with extra cheese, then bake until bubbly. Add your favorite nacho toppings.
- Chicken Quesadillas: Spread the chicken and sauce mixture between tortillas with more cheese and grill until golden.
- Stuffed Bell Peppers: Mix the shredded chicken with cooked rice, stuff into halved bell peppers, top with cheese, and bake.
- Quick Chicken Chili: Use the leftover chicken and sauce as a flavorful base for a quick chili, adding canned tomatoes, beans, and chili powder.
There you have it – the ultimate solution for those "what's for dinner?" moments. Cheesy Salsa Chicken is more than just a recipe; it’s a commitment to deliciousness without compromise. Its dump-and-bake simplicity, vibrant Tex-Mex flavors, and endless versatility make it an indispensable addition to any home cook's repertoire. So next time you're fresh out of ideas, remember this easy salsa chicken recipe and get ready to enjoy a stress-free meal that tastes anything but. Happy cooking!
